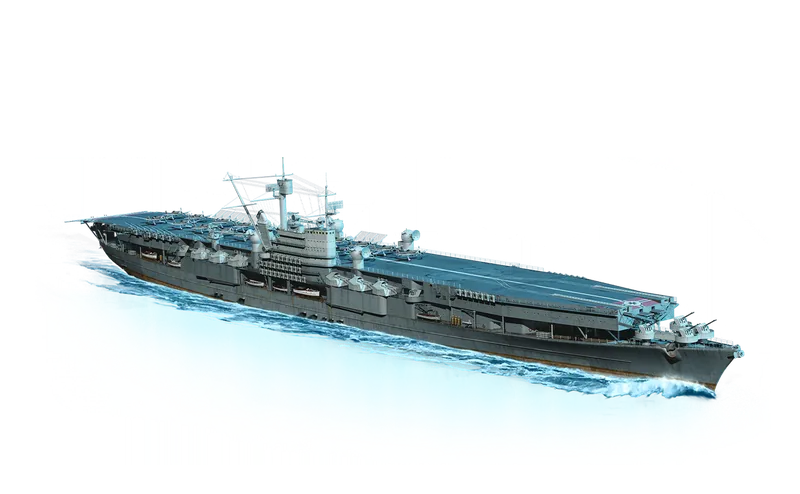
Hit Points65,300
Displacement52,720 t
Hull dimensions ƒ
Length x beam at the waterline, with the hull's draft where the client carries one. Ships whose client entry holds only the 260 x 20 m placeholder use a curated real-world figure instead, and any ship we have no trustworthy size for omits this row rather than print the placeholder. Length matters when dodging torpedoes; beam and draft shape how hard the ship is to hit.
Armor range13–220 mm
Plate armor thicknesses13, 19, 20, 21, 25, 30, 40, 45, 50, 60, 90, 100, 110, 120, 125, 145, 150, 175, 220 mm
Armor material/layer entries72
Fire resistance ƒ
top hull: 1 − 0.6004 fire coefficient = 40%. Does not reduce the damage a burning fire does per second: replay-measured burn ticks run at the full rate on every ship. By elimination it lowers how often hits set you on fire; ignition-rate replay data is consistent with that but too confounded by attacker mix to measure the reduction directly.
Fire duration60 s
Fire damage ƒ
One unattended fire: 0.4% of max HP per second × 60 s = 24% of the pool = 24% × 65,300 HP = 15,672 HP on this ship. 4 fire points can burn at once. Verified against measured burn ticks in replay data.
Flood duration30 s
Flood damage ƒ
One unattended flood: 0.25% of max HP per second × 30 s = 7.5% of the pool = 7.5% × 65,300 HP = 4,898 HP on this ship. Verified against measured flood ticks in replay data.
Torp Reduction ƒ
1 − 0.333 hull torpedo-damage coefficient / 0.333 unprotected baseline = 0%. Reduces torpedo hit damage. Replay data shows no effect on floods: flood ticks run at the full rate and flood frequency does not decline with protection.
Steering gear HP ƒ
Durability of the steering gears. As this pool drops, hits are likelier to jam the rudder; unlike most modules the steering can be knocked out and repaired but is never permanently destroyed.
Repairable: penetration50%
Repairable: citadel10%
Repairable: steering gear50%
Bow section HP ƒ
Damage saturation pool for the bow: penetrations here deal their normal share until roughly this much damage has landed on the section, then further hits on it deal half damage. Our replay analysis shows the step: once a section is saturated, a penetration there deals exactly half (Plymouth AP 1,125 to 563). Across 415 such steps in 180 battles, about 3 in 4 later penetrations on that ship dealt half; the rest landed on sections not yet saturated. A larger pool keeps that part of the ship taking full damage for longer; a small one saturates fast and protects the ship's HP.
Casemate section HP ƒ
Damage saturation pool for the casemate: penetrations here deal their normal share until roughly this much damage has landed on the section, then further hits on it deal half damage. Our replay analysis shows the step: once a section is saturated, a penetration there deals exactly half (Plymouth AP 1,125 to 563). Across 415 such steps in 180 battles, about 3 in 4 later penetrations on that ship dealt half; the rest landed on sections not yet saturated. A larger pool keeps that part of the ship taking full damage for longer; a small one saturates fast and protects the ship's HP.
Auxiliary section HP ƒ
Damage saturation pool for the auxiliary room: penetrations here deal their normal share until roughly this much damage has landed on the section, then further hits on it deal half damage. Our replay analysis shows the step: once a section is saturated, a penetration there deals exactly half (Plymouth AP 1,125 to 563). Across 415 such steps in 180 battles, about 3 in 4 later penetrations on that ship dealt half; the rest landed on sections not yet saturated. A larger pool keeps that part of the ship taking full damage for longer; a small one saturates fast and protects the ship's HP.
Hull section HP ƒ
Damage saturation pool for the hull: penetrations here deal their normal share until roughly this much damage has landed on the section, then further hits on it deal half damage. Our replay analysis shows the step: once a section is saturated, a penetration there deals exactly half (Plymouth AP 1,125 to 563). Across 415 such steps in 180 battles, about 3 in 4 later penetrations on that ship dealt half; the rest landed on sections not yet saturated. A larger pool keeps that part of the ship taking full damage for longer; a small one saturates fast and protects the ship's HP.
Superstructure section HP ƒ
Damage saturation pool for the superstructure: penetrations here deal their normal share until roughly this much damage has landed on the section, then further hits on it deal half damage. Our replay analysis shows the step: once a section is saturated, a penetration there deals exactly half (Plymouth AP 1,125 to 563). Across 415 such steps in 180 battles, about 3 in 4 later penetrations on that ship dealt half; the rest landed on sections not yet saturated. The superstructure is not exempt: it saturates exactly like the bow and stern, so shells aimed at it stop dealing full damage once this pool is used up. A larger pool keeps that part of the ship taking full damage for longer; a small one saturates fast and protects the ship's HP.
Stern section HP ƒ
Damage saturation pool for the stern: penetrations here deal their normal share until roughly this much damage has landed on the section, then further hits on it deal half damage. Our replay analysis shows the step: once a section is saturated, a penetration there deals exactly half (Plymouth AP 1,125 to 563). Across 415 such steps in 180 battles, about 3 in 4 later penetrations on that ship dealt half; the rest landed on sections not yet saturated. A larger pool keeps that part of the ship taking full damage for longer; a small one saturates fast and protects the ship's HP.
Citadel section HP ƒ
This section has no practical saturation cap: every hit here keeps dealing its normal share of damage (on most ships the citadel; on many destroyers the casemate).
Total plane capacity72
Flight deck HP33,400
Hangar HP33,400
Plane HP2,200
Cruising speed174 kt
OrdnanceAP bomb, 3,000 alpha
Squadron size12 planes
Planes per drop4
Bombs per plane2
Bombs per drop ƒ
4 planes per drop x 2 bombs each = 8.
Alpha per drop ƒ
8 bombs x 3,000 alpha = 24,000, if every bomb hits. Before armor, saturation and the target's damage reduction; a real drop lands a share of it.
Hangar max18
Hangar restore+3 every 75 s, start 18
Recovery time75 s
Plane HP2,600
Cruising speed174 kt
Ordnancetorpedo, 4,600 alpha
Squadron size9 planes
Planes per drop3
Torpedoes per plane1
Torpedoes per drop ƒ
3 planes per drop x 1 torpedo each = 3.
Alpha per drop ƒ
3 torpedoes x 4,600 alpha = 13,800, if every torpedo hits. Before armor, saturation and the target's damage reduction; a real drop lands a share of it.
Flooding chance39%
Torpedo arming time3 s
Torpedo arming distance93 m
Hangar max18
Hangar restore+3 every 86 s, start 18
Recovery time86 s
Charges3
Duration60 s
Reload10 s
Charges2
Duration10 s
Reload150 s
Damage reduction-50%
EffectAll aircraft return to carrier.
AA mount points12
Maximum AA range ƒ
Longest-reaching family on the in-game AA card. Base AirDefense aura max range is 5 km; dual-purpose mount auras extend it.
55 mm L/77 Gerät 58 Zwilling12×2 55mm
105 mm L/65 Dop. L. C/38 (DP) ƒ
Dual-purpose: your secondaries doing double duty against aircraft. The same mounts appear on the Secondary Battery card - shared guns, not extra hardware.
Guns55 mm L/77 Gerät 58 Zwilling
Continuous DPS ƒ
Effective DPS: 134 raw aura damage × 3.5 × 1 hit probability = 469 - the same in-game units as the Close-range AA DPS headline.
Range5 km
Guns105 mm L/65 Dop. L. C/38 (DP)
Continuous DPS ƒ
Effective DPS in in-game units (raw aura damage × 3.5 × hit probability, summed per contributing aura) - matches the Close-range AA DPS headline's currency. Includes 224 from dual-purpose secondaries firing as AA in this range band.
Range4.5 km
Total DPS in Aura ƒ
Medium 469 + Far 224 = 693
AA explosions ƒ
Each ~2 s salvo fires 3 AA explosions in quick succession, each leaving 4 clouds ahead of the attacking squadron, plus 2 stray clouds farther out that appear off-beat between salvos - up to 14 clouds per salvo × 230 damage each. Planes that fly into a cloud take its damage; clouds dissipate before the next salvo lands. Defensive AA Fire, where fitted, multiplies the AA explosions within each salvo, and commander skills that raise the Number of AA explosions add to it.
Cloud damage ƒ
Damage a plane takes for flying into one flak cloud, before any reductions.
Cloud spawn chance ƒ
Every potential cloud spawns - the full pattern, every salvo. Often called flak 'hit chance', but spawned clouds always damage planes that fly into them - the roll is on spawning.
Salvo interval ƒ
A new flak salvo (the AA explosions above) fires roughly every 2 s - timed frame-by-frame from gameplay footage and consistent across ships.
Fired by ƒ
Flak keeps firing while at least one secondary battery mount is operational - even losing every dedicated AA mount does not stop it.
Flak zone ƒ
The activation band: flak fires while attacking planes are inside it. Clouds are placed ahead of the planes' path, so clouds can land short of 2.5 km or past 4.5 km - once planes get inside the band, new salvos stop. AA range bonuses push the outer edge out; the 2.5 km inner edge does not move.
Mounts12
Firing range5.5 km
Shell Grouping (σ)1
105 mm L/65 Dop. L. C/38 (DP) ƒ
Dual-purpose: the same mounts also fire at aircraft, so they appear on the AA Defense card too - shared guns, not extra hardware.
Caliber105 mm
Reload time3.35 s
HE alpha1,200
Muzzle Velocity900 m/s
Fire Chance5%
HE Pen20 mm
Secondary dispersion type ƒ
Max dispersion = range (km) × 33 + 30. Each dispersion type sets its own slope; this is not a percentage applied to a standard baseline.
Max secondary dispersion @ 5.5 km ƒ
5.5 km × 33 + 30 = 211.5 m.

Maneuverability
Engine power183,600 hp
Maximum speed32 kt
Turning circle radius1200 m
Rudder shift time16.5 s
Engine power-boost threshold7 kt
Engine spool-up time23 s
Reverse spool-up time11.5 s
Reverse speed ƒ
top speed / 4 + 4.9 = 32 / 4 + 4.9 = 12.9 kt. The community reverse-speed model from the WoWs ShipBuilder project, the same source as the acceleration model on this card. Base value; speed modifiers scale it. Not shown on the in-game card.
Crash stop ƒ
Seconds from top speed to a dead stop after ordering full reverse: reverse power winds in over the reverse spool-up while water drag does most of the braking. Same community-model simulation as the acceleration times, using the ship's own reverse-power ratio. The full curve is on the acceleration chart. A real replay test (one ship, not this one) measured full reverse stopping about a quarter faster than a plain Stop order from top speed, and about a tenth faster from full reverse speed; this simulation only covers the full-reverse case.
Engine boost threshold (reverse) ƒ
Speed below which the engine's built-in power boost applies in reverse. Matches the in-game maneuverability card's reverse threshold (Vampire II reads 10.5 here and the card shows 11; the card rounds half up).
Acceleration 0-90% ƒ
Time to reach 90% of top speed (28.8 kt of 32 kt), from our in-house acceleration model.
Acceleration 0-99% ƒ
Time to reach 99% of top speed (31.7 kt of 32 kt). 99% rather than 100% because true top speed is asymptotic (thrust meets drag), so the last fraction of a knot is never quite gained.
Detectability by sea14.25 km
Detectability by air10 km
Detect when firing (air) ƒ
Air detectability 10 km + gun-firing bloom 0 km = 10 km. The bloom tracks main-battery caliber x 0.020. Matches the in-game 'Detect Firing Air' value on every captured ship.
Detect when on fire (sea) ƒ
Sea detectability 14.25 km + 2.0 km while burning = 16.25 km; matches the in-game 'Detect Fire Sea' value on every captured ship.
Detect when on fire (air) ƒ
Air detectability 10 km + 3.0 km while burning = 13 km; matches the in-game 'Detect Fire Air' value on every captured ship.
Guaranteed Detect2 km
 Automatic Damage Control Party∞ charges · 90 s reload · 60 s active
 Automatic Fighter4 charges · 40 s reload · 150 s active · 5 km patrol radius
 ƒ
Derived from the consumable's 30 m grid-unit range (km = grid units x 30 / 1000):