Also known as Alm. Barroso
Almirante Barroso
Also called: 巴罗索海军上将 Beta- Open the guns from an angle that keeps a hard cover break one turn away
- With no smoke or heal, the island you are shooting past is the only reset she gets
- Avoid: Trading into multiple shooters as though a heal is coming
On this page
Almirante Barroso Community Stats
Log in to GamingDiver and upload your data to see Community Data for Almirante Barroso: community win rate, damage, survival, spotting, and your own comparison.
Almirante Barroso Community Stats
Record History
Playstyle
Overview
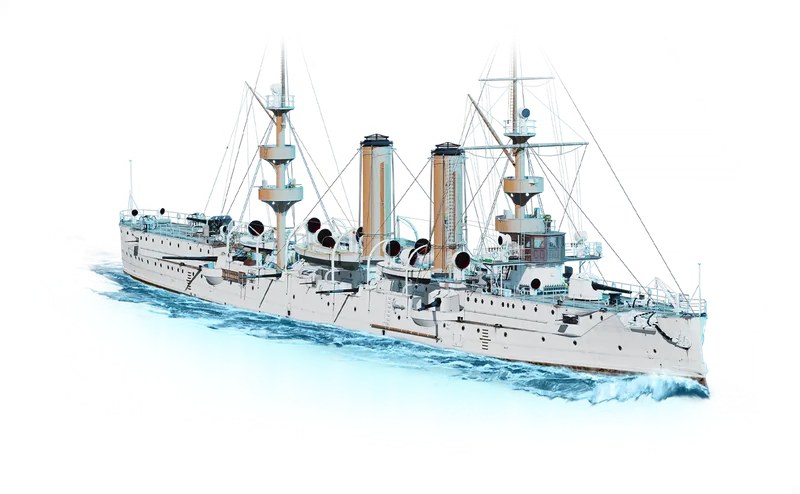
Almirante Barroso is a Tier II Pan-American cruiser: a 152mm HE and AP battery with four secondary mounts reaching 2.5 km. Damage Control Party is her only consumable, with no heal, smoke, or sonar to fall back on, so her health is a one-way resource and the kit is about picking fights she can finish before return fire stacks up.
Positioning
Open the guns from an angle that keeps a hard cover break one turn away. With no smoke or heal, the island you are shooting past is the only reset she gets.
Potato Avoidance
Trading into multiple shooters as though a heal is coming
Nothing repairs this hull, so damage taken early is damage carried for the rest of the match.
Signature Traits
- Tight pattern at max range · 92.4 m
- Fast turret traverse · 10°
- Flat-trajectory sniper
Armor deck in the top bracket. Plunging fire and HE land for reduced damage compared to peers.
20400 secondary DPM (theoretical), bottom decile of T2 CAs. Less per-minute secondary throughput than peers; brawl trade depends more on the mains.
25 mm citadel belt, bottom decile of T2 CAs. Citadels through angle are possible.
How to get Almirante Barroso
Almirante Barroso is a Premium ship and not available to unlock in the Tech Tree. Acquisition path: Early Access.
Official WG availability sources
- Pan-American Cruisers Are Coming to Early Access Early Access / event Start: 2026-03-27 · End: 2026-04-29 Official early-access or tech-tree-line article. Tech-tree ships are temporary crate drops during Early Access, then move to the Tech Tree.
Builds
Start with the standard cruiser priorities: survivability, concealment or positioning control where relevant, and enough reload/accuracy pressure to keep the ship useful all match.
Have a build you swear by? Open it in the Build Tool and hit Save build to share it here.
Cohort position
Hide
▾
Where Almirante Barroso sits among Tier II CAs (25 ships). Notable standouts are shown first; the rest of the cohort-ranked stats are in the expand below. Acquisition variants (Black Friday, Founders Edition) are counted once with their base ship, not as separate peers.
See 19 mid-pack stats
Not standouts for Almirante Barroso -- here's where she sits on every other ranked stat in the cohort. Stats tagged NORM are tied across more than half the cohort, so the value is the cohort default rather than a standout.
Peers in this cohort
Compare Tier II CruisersStats & specs
Customize in the Build Tool →ƒ
Horizontal dispersion ellipse width at max range, from the verified WoWS dispersion model:ƒ
Vertical dispersion ellipse height at max range:ƒ
50%-hit horizontal radius:ƒ
50%-hit vertical radius:ƒ
180 degrees / 10 deg/s traverse speed = 18 s.ƒ
4 broadside guns x 60 / 5.6 s base reload = 42.9.HE shells
ƒ
25 mm ≈ 152 mm caliber / 6 (standard HE penetration ratio).ƒ
2,100 HE damage x 4 broadside guns = 8,400.ƒ
8,400 HE full-salvo alpha x 60 / 5.6 s base reload = 90,000.ƒ
42.9 shells/min x 7% fire chance = 3.AP shells
ƒ
floor(152 mm caliber / 14.3) = 10 mm (AP auto-penetrates plating this thick or less).ƒ
Canonical community AP formula (jcw780/wows_shell), evaluated at muzzle velocity: . Matches the in-game spec card.ƒ
Same formula at the ship's max firing range (12.9 km), where the shell has slowed to 333.1 m/s: .ƒ
2,550 AP damage x 4 broadside guns = 10,200.ƒ
10,200 AP full-salvo alpha x 60 / 5.6 s base reload = 109,286.ƒ
AP shell over-penetration splash radius; scales with shell mass. Wickes 102mm = 3, standard 152mm CL ~ 20, Iowa 406mm ~ 270, Yamato 460mm = 400, Incomparable 650mm = 550 (max). Larger value = bigger splash damage area when AP over-pens.ƒ
In-game AA card max range: None km. Only the longest-reach family contributes at this distance.ƒ
Max dispersion = range (km) × 57 + 30. Each dispersion type sets its own slope; this is not a percentage applied to a standard baseline.ƒ
2.5 km × 57 + 30 = 172.5 m.ƒ
Time to reach 90% of top speed (18.2 kt of 20.2 kt), from our in-house acceleration model.ƒ
Time to reach 99% of top speed (20.0 kt of 20.2 kt). 99% rather than 100% because true top speed is asymptotic (thrust meets drag), so the last fraction of a knot is never quite gained.ƒ
How many degrees the turret can swing for each degree the hull turns. Turn rate , so . Below 5 the turrets drag in a turning fight; 25+ keeps up with any rudder.ƒ
max(base sea detectability, gun-firing bloom range). Firing never pulls your detection closer than base concealment.
Damage Control Party∞ charges · 60 s reload · 5 s active
See all derived stats
Show
▾
All values are ship base stats with modifications and upgrade changes denoted inline.
Numbers the spec table cannot show directly: alpha-strike math, DPM, dispersion, AP penetration. Click the formula chip on any row to reveal how it is calculated.
Main battery formulas
Horizontal dispersion ellipse width at max range, from the verified WoWS dispersion model: Horizontal scatter at a fixed 5 km, from the same verified dispersion model as the rows below - a knife-fight-range anchor comparable across ships.How wide your shells scatter at 10 km, from the same dispersion model as the max-range figure above. Picking a fixed range makes this number directly comparable from ship to ship: max-range dispersion makes a longer-range gun look worse even when it's tighter at any common range. The interactive Dispersion tab on the Charts card plots the full curve from 0 to max range.Vertical dispersion ellipse height at max range: How tall the same scatter ellipse is at 10 km. Comparable from ship to ship for the same reason as the width value above. The height/width ratio is a piecewise-linear curve through three points from the ship's own dispersion data: at 0 m, at m, and at 10318 m. Above the kink: , so .50%-hit horizontal radius: 50%-hit vertical radius: Canonical community AP formula (jcw780/wows_shell), evaluated at muzzle velocity: . Matches the in-game spec card.Same formula at the ship's max firing range (12.9 km), where the shell has slowed to 333.1 m/s: .AP penetration at a fixed 5 km, read off the same PC-validated ballistic curve as AP Pen Close/Far: the shell's impact velocity at that range fed through the canonical community AP formula . Fixed anchors make ships directly comparable at the same fighting distance; the Charts card plots the full curve.AP penetration at a fixed 10 km, read off the same PC-validated ballistic curve as AP Pen Close/Far: the shell's impact velocity at that range fed through the canonical community AP formula . Fixed anchors make ships directly comparable at the same fighting distance; the Charts card plots the full curve.How long an HE shell takes to reach a target at a fixed 10 km, from the same numerically integrated trajectory the Charts card plots. The shell slows under quadratic air drag, , where is air density from a standard-atmosphere profile and bundles the shell's drag coefficient, caliber and mass: . That runs from a 853 m/s muzzle velocity in 0.02 s steps under gravity 9.8 m/s² until the shell lands, then divides by 2.77: the game clock runs faster than real time, and that factor was measured against stopwatch runs in the Training Room. Lower is better, since a faster shell is harder to dodge and needs less lead.How long an AP shell takes to reach a target at a fixed 10 km, from the same numerically integrated trajectory the Charts card plots. The shell slows under quadratic air drag, , where is air density from a standard-atmosphere profile and bundles the shell's drag coefficient, caliber and mass: . That runs from a 853 m/s muzzle velocity in 0.02 s steps under gravity 9.8 m/s² until the shell lands, then divides by 2.77: the game clock runs faster than real time, and that factor was measured against stopwatch runs in the Training Room. Lower is better, since a faster shell is harder to dodge and needs less lead.25 mm ≈ 152 mm caliber / 6 (standard HE penetration ratio).floor(152 mm caliber / 14.3) = 10 mm (AP auto-penetrates plating this thick or less).AP shell over-penetration splash radius; scales with shell mass. Wickes 102mm = 3, standard 152mm CL ~ 20, Iowa 406mm ~ 270, Yamato 460mm = 400, Incomparable 650mm = 550 (max). Larger value = bigger splash damage area when AP over-pens.Barrels that can bear on one beam (4 of 6); casemate/wing mounts only fire one side.180 degrees / 10 deg/s traverse speed = 18 s.2,100 HE damage x 4 broadside guns = 8,400.2,550 AP damage x 4 broadside guns = 10,200.8,400 HE full-salvo alpha x 60 / 5.6 s base reload = 90,000.10,200 AP full-salvo alpha x 60 / 5.6 s base reload = 109,286.4 broadside guns x 60 / 5.6 s base reload = 42.9.42.9 shells/min x 7% fire chance = 3.AA defense
In-game AA card sum: None DPS, achievable only when a target is inside the shortest-range AA family. Captured as a point-blank total only -- per-family breakdown not yet recorded for this ship, so the DPS at None km is unknown.In-game AA card max range: None km. Only the longest-reach family contributes at this distance.Secondary battery dispersion
Max dispersion = range (km) × 57 + 30. Each dispersion type sets its own slope; this is not a percentage applied to a standard baseline.2.5 km × 57 + 30 = 172.5 m.Secondary battery firepower
Sum across all secondary families of (per-side barrels × 60 / reload_s × alpha), where per-side barrels = mounts × barrels-per-mount / 2 (the guns that bear on one broadside target). Per-family: 4×1 120 mm (2/side) × 60/10 × 1700 = 20,400. Assumes every shell hits (real hit rate is lower; the Brawl matchup tool on the Compare page folds in dispersion + target armor).Maximum HE damage per shell across secondary HE families. Best on this ship: 1700 from the 120 mm family.Maximum per-shell fire chance across secondary HE families (before target fire resistance is applied). Best on this ship: 4% from the 120 mm family.Maximum HE armor penetration across secondary HE families (caliber × 1/6 for most nations; 1/4 for German/UK BBs). Shells whose pen falls under a plate's armor thickness shatter for 0 hull damage though fire chance still applies. Best on this ship: 20 mm from the 120 mm family.Armor Beta
Hull HP 23,300, distributed across 5 hull zones, each with its own plate thicknesses, saturation cap, and pen thresholds. HP caps are the exact in-game values, not estimated.
Overmatched by 105+ guns across the bracket. Can’t reliably bow-tank; gets bow-citadelled and overpenned.
Superstructure and extremities take HE pens and AP overpens from nearly any gun: steady chip damage. Fire resistance 3%, fires burn 30s. Range-by-range in the Compare tool →
| Section | Plates | HP cap | Threats | Tactic |
|---|---|---|---|---|
| Bow | 6 mm primary (range 6–13 mm) | 1,300 (6% of HP) | Overmatched by 127mm+ (Farragut, Shenyang)6 mm: HE pens from 127mm+ | Bow-tank fits behind this exterior plate. Saturation is FAST here; the cap is often only a few thousand HP. |
| Hull (midship) | 6 mm primary (range 6–13 mm) | 11,500 (49% of HP) | Overmatched by 127mm+ (Farragut, Shenyang)6 mm: HE pens from 127mm+ | Largest HP pool. Citadel sits behind these plates; thinner deck and side plating absorb the rest. |
| Stern | 6 mm primary (range 6–25 mm) | 1,100 (5% of HP) | Overmatched by 127mm+ (Farragut, Shenyang)6 mm: HE pens from 127mm+ | Mirror of bow. Same fast saturation. |
| Citadel | 25 mm primary (range 10–25 mm) | ≈ 165,500 (effectively no cap) | Citadel pen: full damageOver-pen: ×0.10 damage | Effectively no cap; citadel pool sits at ~165k HP on every ship. An AP citadel penetration deals the shell's full damage, the biggest single hit available; only over-penetrations are damped, to ×0.10. |
| Superstructure | 6 mm primary (range 6–76 mm) | 400 (2% of HP) | Any HE ≥16 mm pens at full damage | Any HE ≥16 mm pens at full damage. HE-spam target, and the section saturates fast (often only a few thousand HP). |
| Turret (module, per magazine) | separate HP pool, does not drain ship HP | 7,700 magazine HP | Turret knocked out | Per-turret powder-magazine HP, a separate pool that does not drain ship HP. As it is worn down the turret is likelier to be knocked out, and a smaller pool gets there faster. |
| Secondary mount (120 mm mount) | separate HP pool, does not drain ship HP | 800 per-mount HP | Destroyed at 0 HP | Per-mount HP for the heaviest secondary on this ship. A mount destroyed at 0 HP is out for the rest of the battle; DCP does not repair destroyed mounts. Smaller (lighter-caliber) secondaries typically share the same HP value. |
| Rudder (module) | separate HP pool, does not drain ship HP | 4,600 module HP | Incapacitated at 0 HP | When module HP reaches 0 the rudder locks at its current angle until DCP repairs it. Repair via Damage Control Party. |
Saturation cap = HP a section can absorb before further damage to it is reduced (the "bow-tank" effect). Citadel pool is ~165k on every ship (effectively no cap); damage is gated by pen/over-pen multipliers instead. Superstructure saturates fast but HE always pens regardless of the plate thickness. Rudder (and other module HPs) are a separate pool from ship HP: damaging a module doesn't drain ship HP. Incapacitated modules like the rudder and engine are restored by DCP, but secondary and AA mounts destroyed at 0 HP stay out for the rest of the battle.
Ship Charts
Skins & permanent camouflages
Every custom exterior Almirante Barroso can equip, from in-game data.
DefaultThe ship’s standard exterior
Primary official WG sources
Filtered to official World of Warships: Legends pages where this ship is a focus, reward, line member, or high-context variant mention.