Hit PointsInitial: 32,200 → 33,200
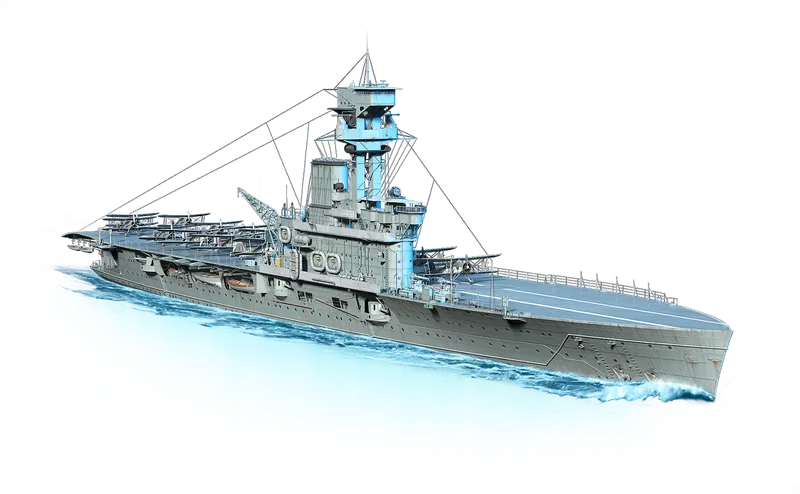
Displacement13,700 t
Armor range10–76 mm
Plate armor thicknesses10, 13, 16, 20, 25, 76 mm
Armor material/layer entries48
Fire resistanceInitial: 6.7% → 10%
Fire duration60 s
Torp Reduction0%
Total plane capacity36
Flight deck HP16,600
Hangar HP16,600
Plane HP1,900
Cruising speed108 kt
OrdnanceHE bomb, 3,500 dmg
Fire chance25%
Bomb penetration27.1 mm
Hangar max12
Hangar restore+4 every 270 s, start 8
Recovery time270 s
Plane HP2,000
Cruising speed107 kt
Ordnancetorpedo, 4,367 dmg
Flooding chance45%
Torpedo arming time3 s
Torpedo arming distance65 m
Hangar max12
Hangar restore+4 every 270 s, start 8
Recovery time270 s
AA mount points0
102 mm/45 Mk V (DP) ƒ
Dual-purpose: your secondaries doing double duty against aircraft. The same mounts appear on the Secondary Battery card - shared guns, not extra hardware.
Close-range AA DPS ƒ
Sum across every AA aura on this ship of (aura.continuous_damage x 3.5 x aura.hit_probability). Here: (3×3.5×1) = 10. Covers AA-only mounts plus dual-purpose secondaries (Bismarck 105mm, USN 5"/38 cruiser secondaries) and dual-purpose main batteries (Sumner-class 5"/38, Akizuki-line 100mm). Formula validated against in-game captures on California, Sumner, Manfred von Richthofen, Dante Alighieri (exact) and within +/-17% on the remaining verified ships. Flak is NOT included: flak stops triggering once planes are inside 2.5 km, and its avoidable burst damage is shown separately in the Flak bursts section.
Maximum AA range ƒ
Longest-reaching aura across AA-only + dual-purpose auras.
Guns102 mm/45 Mk V (DP)
Continuous DPS ƒ
Effective DPS in in-game units (raw aura damage × 3.5 × hit probability, summed per contributing aura) - matches the Close-range AA DPS headline's currency. Includes 10 from dual-purpose secondaries firing as AA in this range band.
Range3.5 km
Bursts ƒ
Each ~2 s wave fires 2 quick salvos of 1 clouds ahead of the attacking squadron - up to 2 clouds per wave × 130 damage each. Planes that fly into a cloud take its damage; clouds dissipate before the next wave lands. Defensive AA Fire, where fitted, multiplies the salvo repeats within each wave.
Cloud damage ƒ
Damage a plane takes for flying into one flak cloud, before any reductions.
Cloud spawn chance ƒ
Every potential cloud spawns - the full pattern, every wave. Often called flak 'hit chance', but spawned clouds always damage planes that fly into them - the roll is on spawning.
Wave rate ƒ
A flak wave spawns roughly every 2 s - timed frame-by-frame from gameplay footage and consistent across ships.
Fired by ƒ
Flak keeps firing while at least one secondary battery mount is operational - even losing every other AA mount does not stop it.
Flak zone ƒ
The activation band: flak fires while attacking planes are inside it. Clouds are placed ahead of the planes' path, so bursts can land short of 2.5 km or past 3.5 km - once planes get inside the band, new waves stop.
Mounts9
Firing range3.5 km
Shell Grouping (σ)1
Secondary dispersion type ƒ
Max dispersion = range (km) × 57 + 30. Each dispersion type sets its own slope; this is not a percentage applied to a standard baseline.
Max secondary dispersion @ 3.5 km ƒ
3.5 km × 57 + 30 = 229.5 m.
Caliber102 mm
Reload time4 s
HE Damage1,500
Muzzle Velocity811 m/s
Fire Chance6%
Armor Pen17 mm
Min Ricochet91°
Max Ricochet60°
Show 1 more gun family
Caliber140 mm
Reload time5 s
HE Damage2,000
Muzzle Velocity850 m/s
Fire Chance8%
Armor Pen23 mm
Min Ricochet91°
Max Ricochet60°

Maneuverability
Engine power40,000 hp
Maximum speed25 kt
Turning circle radius750 m
Rudder shift time9.6 s
Engine power-boost threshold7 kt
Engine spool-up time23 s
Reverse spool-up time11.5 s
Acceleration 0-90% ƒ
Time to reach 90% of top speed (22.5 kt of 25 kt), from our in-house acceleration model.
Acceleration 0-99% ƒ
Time to reach 99% of top speed (24.8 kt of 25 kt). 99% rather than 100% because true top speed is asymptotic (thrust meets drag), so the last fraction of a knot is never quite gained.
Detectability by sea11 km
Detectability by air7.71 km
Detect after firing main guns ƒ
max(base sea detectability, gun-firing bloom range). Firing never pulls your detection closer than base concealment.
Detect Fire Sea13 km
Detect Fire Air10.71 km
Guaranteed Detect2 km
 Automatic Damage Control Party∞ charges · 90 s reload · 60 s active
 Automatic Fighter4 charges · 40 s reload · 150 s active · 5 km patrol radius
 ƒ
Derived from the consumable's 30 m grid-unit range (km = grid units x 30 / 1000):